Picturebook Journey, from idea to published…

…told mostly through images. Click on any image for a closer look.

New-Kid-1The idea for The New Kid started when I observed a small girl in The Happy Pear coffee shop. Something about the way she was wearing her coat resonated with me, reminded me of myself as a child… the above on-the-spot sketches and first version of text are dated 3rd January 2010.

New-Kid-2Early draft of the text which I printed out and immediately covered in edits. There were many rewrites and edits through-out the process, right up until I sent off the final art.

Early thumbnails as I tried to work out the story visually. I did this alongside shaping the text. Again, I wrote notes to myself all over these – change this, change that. These are working roughs, all about getting the idea out onto paper, not about making nice drawings.

Then I did sketches to find my characters. Ellie is based on the little girl I saw so I had her set from early on. The others had to emerge…

These images are from a set of more coherent roughs – I’m still working small, three spreads to an A3 sheet of paper – but I’m getting closer each time to how the book will look. I did at least three versions of the book at this size, copying the images which were working and changing/tweaking/losing others with every layer of reworking.

When I was happy with how it was working I made up a full size dummy and sent a copy to my agent (now I’d make a PDF and send it too). She showed it to Hodder and I had a contract! Yay! This was, I think, mid 2011. The work described above was done in two/three/four week runs, with gaps in between doing other things.

The editors then sent me comments, suggested some changes, pointed out weak spots…

New-Kid-18…and I took most of these onboard as I knew they would improve the book. One or two things I didn’t agree with, so we discussed and compromised, or I left those out. I did another set of full size roughs, there were a few more tweaks and finally…

…a set of ‘finished’ roughs – a set as close as I could get to the final images before going to colour. Last chance for major changes, so everyone looked at them very carefully. I roughed in the text as already planned with the design editor. Text needs to be placed where it reads well, looks well, and is not too near gutters or edges. There needs to be room to allow translations into languages, such as German, which will need more space. As the text in this book is sitting on the images I needed to make sure I didn’t paint fussy texture or dark tones underneath.

It was finally time to begin the finished art:

I worked in acrylics. It was very labour intensive and took about six months to complete – 15 spreads averaging two weeks a piece (some 1 week, some 3), and of course a few hit the bin along the way.

I referenced loads of images as I worked, some to ensure drew the animals/vehicles correctly, others were for colour reference. I had taken many photos a friend’s dog, and of a street in Cobh, other images were from books and the internet.

New-Kid-19

Then came the endpapers and the cover. The cover is very important as it is what makes people pick up the book in the first place – I’ll blog about that journey another day.

I sent off the art by courier and then a month later a set of colour proofs arrived – my absolute last chance to pick up errors in the text and tweak the colours if any of them looked strange. The colours in the final book will never exactly match the art; the best that can be accomplished is a close match with no odd colours. A few changes were needed – a spelling fix on the title spread, one spread looked rather dark, and the skin tones in two  had gone a little peachy.

The book headed off to China to be printed and bound. It can take six months to a year  to arrive back and be distributed to shops. I got my first copies in May 2014, so it had taken 4 years and 4 months from initial idea through to published book. About 10 months work spread out over that time, it’s hard to tell exactly; I was working on other books in between.

7Melfitz

It was a fairly typical picturebook journey for me; other writer/illustrators have different or similar processes and take less or more time. Michael discusses his process here: miss-brooks-story-nook-the-art-part-1

This post is especially for the students and staff at Marino Institute of Education, where I have very much enjoyed being this year’s writer-in-residence.


Miss Brooks Story Nook – the art (part 4)


missy 2 jacket finalb In Parts one through three of this blog I talked about creating the art for the children’s picture book, Miss Brooks Story Nook, (were stories are told and ogres are welcome), from the very first sketches, to finished pencil drawings ready for painting.

Below are finished drawings clipped up on my studio wall. You can see two smaller drawings clipped to the top, which is new art for this spread, I decided on after I supposedly had, um,  finished. I try not to do this kind of last minute endless changing, it can lead to madness. I’m never completely happy with what I’ve done anyway. But… sometimes it’s worth it. And this was one of those times. Miss-Brooks-studio-4b

For whatever reason I can only guess at now, I decided to paint the rejected drawings along with the new art meant to replace them. This turned out to be a dumb thing to do, as you’ll see later.paint dots

I used soft, tube watercolors for this book.  start all painting for a book like this,figuring out my palette of must-have colors. For instance, I know for sure all the kids will have skin…, so I start by putting in the skin tones. It’s an easy way to jump into the process without freaking out trying to decide where to start.  In this case a lot of that mock caucasian skin that looks a bit like the color of a Band-Aid. It looks a bit garish but experience tells me put it in stronger than might look right, because once all the other colors are in, if you make it look good alone on white paper, it will look too pale later. And I try to only make the same mistake 3 or 4 times before I wise up…

IMG_0246b

I mix the colors I will definitely need ahead of time – hopefully enough for the entire book. I’ll use good, expensive paint and brushes, and nice porcelain pots like the one above. (I think I might have stolen that one from my father years ago). It never pays to scrimp on materials. You always regret it.

I’ll mix skin colors for the main character, Missy, first, then certain specific colors for her blue overalls and the pink and green stripes of her hat, that have to be used as they are from the previous book. Then I’ll paint them all at once, so they look consistent throughout the book. I can spend an hour painting little green stripes. That’s why I put all the art up on the wall. So I can scan for every place the striped hat appears. And Yes, I do screw up sometimes and somehow not notice one stupid hat and have to try and salvage dried up paint to match it with the other hats as much as possible. IMG_0260b

It can be frustrating to not have a single finished painting until the book is all done. But it’s the only way I know to do it without color shifts.

Below you can see one of my aging brain tricks, which is to mix colors and label them since I forget instantly what exact colors I used for something. And it even matters what brand of color you use. Rembrandt Rose Madder Genuine will not mix the same way as Windsor and Newton Rose Madder Genuine. No two colors are exactly the same, and mixing the exact same color twice is practically impossible, which is why I mix a bunch of some color I plan on using. If I do run out, I can try and remember what I used. IMG_0240

As you can see first I did Missy’s skin, hair, then the striped hat, blue overalls, and Billy’s skin hair, and turquoise track suit. Then the rest of the colors.

IMG_0259

Below is the final color painted art. The scarf is in similar colors as her hat, but it was OK to paint them at different times, because they are not the same. The top image is not going to be used in the final book , but, as I said before, I painted them anyway.

MissBrooksStory-color-1034b

And below is the right hand page of the spread. It’s particularly important to make sure pages that will be seen together, if they have the same character, in the same clothes, they need to be the same.

MissBrooksStory-color-1035b

Below is the first printed proof for the book, with my notes, and with the wrong art on the top left. And it’s all because I inexplicably painted it in. Someone naturally assumed this was the correct art. Who wouldn’t? I covered it with a piece of paper taped over but it wasn’t enough.

Story Nook FG notes031b

Below is the final, fixed spread as it appears in the book with the new art on top.

missy blog001b

By the time the book is finished, the studio is a mess, with palettes of color mixed paint, and test paint papers all over. A contrast to the small pile of neat illustrations to be mailed to the Knopf art director in New York.

IMG_0304

See also:

Miss Brooks Story Nook – book page

More on the art for this book:

Miss Brooks Story Nook, The Art – Part One.

Miss Brooks Story Nook, The Art – Part Two.

Miss Brooks Story Nook, The Art – Part Three.

Miss Brooks Story Nook – the art (part 3)

missy 2 jacket finalbIn parts one and two of this blog entry, I  talked about creating the sketches and then the finish pencil drawings for the children’s picture book, Miss Brooks Story Nook (where tales are told and ogres are welcome).  In this segment I’ll talk more about bringing the art closer to the finished, full color, printed artwork, some abandoned ideas, and evolving final layout.

Below are the finished pencil drawings for the spread in the book I’ve been using as an example. The scene is near at the end of the book, where the main character, Missy, confronts her nemesis, Billy. One of the themes of the book is about the power of storytelling.  As you can see, there is an element of fantasy in the book, where Missy’s story telling is meant to be so vivid it comes alive. This was a complicated idea to illustrate, but it happens a lot in children’s books so I’ve had experience dealing with it before.

Miss pencil spread blogMissy snake 2 blog

Missy, who is telling a tale about her neighbor’s snake she has been given as a gift, needs to be seen as both, “giving Billy her best ‘snake-eyed’ look”, but she cannot actually turn into a snake because I was told she couldn’t. At this point I can’t remember who rejected that idea, there are so many back and forth exchanges when I’m creating the art with the editor, designer, author (and possibly sales people). but it was one of many ideas that was shelved for one reason or the other.

But you can see in the finish drawing and sketch to the right, I still used the “snake-eye” idea as a three part point of view sequence, but removed it and any other suggestion Missy has become part snake. So I ended up using just two visual interpretations of Missy manifesting a snake through her storytelling – eyes and scarf.Miss Brooks bw scans057

Missy snake stair blog

In the sketches above and left you can see me working out the extent of cartoon vs. realism for the snake, and the rejected “missy-snake” idea.This one even has a scarf like tail… The snake popping out Billy’s eyes so that they bounce down the sidewalk(pavement) is in the text and in the final book art, but without glasses and hat. I rather like the Missy snake. It certainly looks nightmarish enough to scare away a thuggish brute like Billy.

The scene to the left is also in the book but again, the snake is not wearing a Missy hat and glasses as here…

Then there was a idea of what the snake was supposed to do to Billy. Before the text changed to popping his eyes out, it was a basic, “It’s gonna eat you up!” or something like that. So I drew that scene too. I like the idea of the bully being devoured. Like so many rejected ideas, maybe I’ll get to use it in some other book.

Miss Brooks bw scans011Miss Brooks bw scans012

On Friday, in part 4, the painting begins.

See also:

Miss Brooks Story Nook – book page

More on the art for this book:

Miss Brooks Story Nook, The Art – Part One.

Miss Brooks Story Nook, The Art – Part Two.


Miss Brooks Story Nook, the art (part 2)

missy 2 jacket finalbIn part one of this post, I talked about creating the art for Miss Brooks Story Nook (where tales are told and ogres are welcome),written by Barbara Bottner,  beginning with the sketches and how they build from the very first loose drawings done directly on the text layouts, up to the final pencil line drawings. Below have a look at the final line drawings pinned up in the studio. The room I am renting at the moment is quite small so I must clip them up on a rack I made so I can see them all at once. It’s important to be able to see the whole book at once to see what may be missing or not up to snuff. And when the painting begins it’s important because I work a little bit at a time from one drawing to another. More about that later… the two color illustrations you can see are test images to show the publisher the look of the final art.

Miss-Brooks-studio-1b

As you can see, I do all the final line drawing at once, before beginning the color painting. One big reason to do this is to try and have the the line work look as consistent as possible throughout the book. Believe it or not, I can draw slightly differently from week to week, day to day, maybe even hour to hour.

Below is the final pencil line art for the spread I talked about in Part One of this blog. I used a 5mm mechanical pencil in a B grade (I think), on cold press Arches 90lb watercolor paper. I use Arches as it’s readily available and there’s nothing worse than running out of paper mid job. The thin 90lb paper is because I use a light table to draw the final art from sketches.

As you’ll see later,  the bottom illustration is final, but the top image will change before the book is published. Both Missy and Billy will be replaced by new drawings.

Miss Brooks final line 009b

Below is the final pencil line art for the right hand page of this spread. It does not change. You can see I’m labeling the art, Miss Brooks Book Nook, not the final title, Miss Brooks Story Nook, but it was the working title I liked best so it was the only one I could remember.

Miss Brooks final line 005b

In part one I followed one spread, the climax of the story, from sketches to final pencil art, in which the main character, Missy, confronts her nemesis, Billy, giving him a serious stare-down with her “snake-eye” look.

Miss-Brooks-studio-4b

Above is the art for this spread pinned up on the wall. Notice the two smaller drawings clipped to the page at left. I mentioned I made a late change to the art? Two things bugged me: one was that long coat – I loved it, but decided it was more consistent to have her wear her easily identifiable blue overalls – and I thought Billy should be showing more of how crazy he was.

Crazy Billy
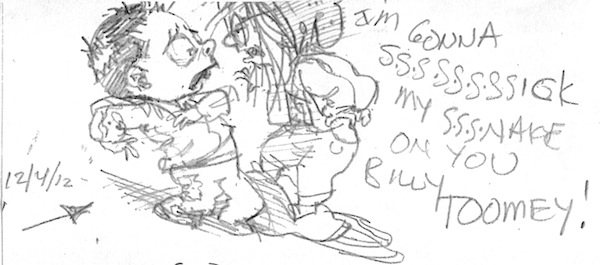
Here is Crazy Billy close-up.(above) He looked a bit angry before, which he is, but his madness I thought was a better way to play the scene. I’m so glad I did make the change. I love “crazy Billy”. Look at him – he’s crazy!

Two Missys

Above are the two Missy drawings side by side. Right is the new/final one. Like the coat on left but decided on keeping her outfit consistent.

Miss Brooks bw scans002b

These (above) are sketches I had done to further explore Missy’s “snake eye” smack down with a wild snake scarf. They were put aside when I created the animated sequence on the right hand page.  (Can you see  the little black arrows above? I use these all the time as a note to my self  indicating which sketches on the page I like and want to remember.)

Snake-eyes-7b

Above is a close-up of the drawing I liked the most. You’ll see later in the third and final part of this blog – Miss Brooks Story Nook, Part three – The Color Art – this particular drawing, and the one of Billy, are not wasted. Due to another late text change, they end up being used, almost untouched, for the new climax scene following the snake-eye spread.

More on the art for this book: Miss Brooks Story Nook – book page.

Miss Brooks Story Nook, The Art – Part One

Miss Brooks’ Story Nook – the art, part 1

missy 2 jacket finalbIn my new book, Miss Brooks Story Nook, (written by Barbara Bottner) the illustrations took me over a year to finish. Which is not unusual for me. Why so long? Well, I’m slow, for one thing. But in general the work of illustrating a picture book is not constant. There are several stages you need to go through, from rough sketches of characters, layouts, final sketches, line drawings, then color, with breaks in between for the publisher, (editor, designer), and author to review what I’ve done, and send back comments, which I will listen to, or, ignore. They will listen to me and agree or disagree, and so on, back and forth, until we have negotiated the final look of the book.  Sometimes a decision is made by the author or editor, based on what I’ve drawn, to change the text. And sometimes a change is made to the text while I’m drawing. This all adds time.  So where do I begin? First I read the latest text over and over. Sometimes the editor sends just the written text, and sometimes the text is roughly positioned on layouts in the chosen typeface, as it might appear in the final book. This is helpful as it gives me an instant idea of how much room I have for art, and how the editor sees the page break down. This may remain unchanged, or, more likely, I will change things around a bit. For example, look at a spread below, where the main character, Missy, is staring down her nemesis, a boy named Billy, giving him, as the text states, her best “snake eyed” look. Missy book nook054b I almost always begin the sketch process right on the print-outs of the text layouts. As you can see above, I’m already working on ideas. This is a character I’ve drawn before so I did not need to completely re-create her for this book. The hair, glasses, overalls and stripe hat are a carry-over from the previous book. Missy-BillybNext I move on to sketch books, working at home, or in coffee shops, creating the characters first, then thinking about different scenes each character must “act out”. You can see the date of the above sketch of Missy and Billy, when I began the process – over a year and a half from the book’s publication date of Aug. 2014. This drawing (above) is one of the first sketches I did for this book. This seemed like the pivotal scene of the book, so I’m focusing on it. I still love this drawing, and as usual, I seldom get as good, and as fresh a drawing in the final book as I get in the first few moments of visualizing a story. Sigh. Snake eyes4b Missy book nook014b


Above (left) is the original sketchbook page and the detail on the right of Missy in the “snake Eye” scene. As you can see, I work on many ideas at once. So only one small drawing on this page is from this scene. Notice the unused raincoat outfit for Missy. I love the coat, but there was no room for it. Below I’m trying to visualize the “camera angle”. Notice I’m playing around with the idea of a long winter coat and scarf for Missy. The scarf acting like a kind of snake. Below that I’m developing the idea further but this actually will be the blueprint for the next page, due to changes in the text.

Missy book nook022b Snake eyes 5b               Missy book nook009b Snake eyes 2b

Miss Brooks bw scans001b Snake eyes b Above is a further refinement of the actual image to be used. Focus being on face front, and the view point of the eyes. Below you can see how I developed a new layout with a focus on the eyes/faces of both, in a cinematic “animated” panel sequence for the right page of the spread and a scene, (still desperately trying to get in that raincoat on the left). Changes like this often occur as the text changes because each new spread layout is considered as a whole. And there were more than the normal amount of text changes in this project. Miss-Brooks-Book-Nook-12b(Below) I went back to a face-on Missy on the bottom left, and fooling around with the idea, ultimately rejected, of her wearing a different hat than that in the first book. Also see refinement in the sequence of the two staring each other down… Miss-Brooks-Story-Nook-30-31flatbMiss Brooks final line 009b And here is the final BW pencil drawing for this spread. Notice the stripe hat is back but she is still in a long coat – which will change before the final book is printed, as will the drawing of Billy… More on the finish art in The Art – part 2…